

Best YouTube Music to MP3 Converter
Have you ever felt the need to burn your favorite Youtube music onto a CD so that you can play it in any situation – car rides, workouts, family get-togethers - without worrying about having internet access? Moving Youtube Music to a CD can give you the control and convenience you want for enjoying playback without being limited by internet connections or device resources.
One of the most important preconditions to burn music from YouTube or YouTube Music is making sure the YouTube songs are downloaded to your local path on the computer. Therefore, you can easily copy and transfer the downloaded YouTube Music to CDs or DVDs with some burning tools. So, how you can download YouTube Music for CD burning? In this article, we will introduce 3 different ways to burn YouTube Music to CD on Windows and Mac. Let's continue the reading.

It turns out that you need to first succeed in downloading YouTube Music onto the computer as movable audio files, so you can burn YouTube to a blank CD. Unfortunately, being Premium while downloading music for offline playback doesn't download YouTube Music into CD-compatible audio files. Premium users are only given chance to cache YouTube Music in the mobile app for offline playback, especially when they stay in any Internet-off situations like airplane mode. The "Downloaded" YouTube Music can either be applied as a ringtone or used for CD copying. What's worse, you will find no way to directly download songs from YouTube Music to the computer.
Sidify YouTube Music Converter is a straightforward as well as ultimately the best way to download YouTube Music to the PC for CD burning. This downloader is capable of downloading songs and playlists from YouTube Music, converting YouTube Music to multiple audio formats, and saving YouTube Music to the computer with easy reach. These benefits make it possible to burn your favorite YouTube Music in different audio formats like MP3, but also AAC, ALAC, FLAC, WAV, and AIFF to a CD.
Besides, YouTube Music Converter empowers users to download YouTube Music with original ID3 tags kept. It also processes YouTube Music downloading at 10 times faster than standard.

If you want a tool to convert any streaming music (including Spotify, Apple Music, Amazon Music, Tidal, Deezer, YouTube, YouTube Music, SoundCloud, DailyMotion …) to MP3, Sidify All-In-One is the go-to choice.
 700,000+ Downloads
 700,000+ Downloads
You can download up to 10, 000 songs from Spotify for offline listening with a Premium account. However, we can’t directly burn the Spotify downloads to a CD. Go with this article to find the workaround!
Learn More >Step 1Access YouTube Music Web Player
Run YouTube Music Converter on your computer and log in to your YouTube Free or YouTube Music Free account to access the YouTube Music web library.

Step 2Add YouTube Music to Conversion Panel
Find the YouTube Music songs in the music library and tap Add button. And select the YouTube songs that you want to download offline.

Step 3Choose YouTube Music Output Format
Click on the "Settings" button in the lower left corner to customize the output settings. You can set up the output format (MP3, AAC, ALAC, FLAC, WAV, and AIFF), the Output Quality (320kbps, 256kbps, 192kbps, 128kbps), and the Output Path in sequence.

Step 4Export YouTube Music in MP3 Files
Click on the "Convert" button to start converting and downloading the YouTube songs in MP3.

Step 5Check YouTube Music MP3 Files Locally
After the conversion is completed, you can click the "Converted" tab to find the well-converted music from the local drive.
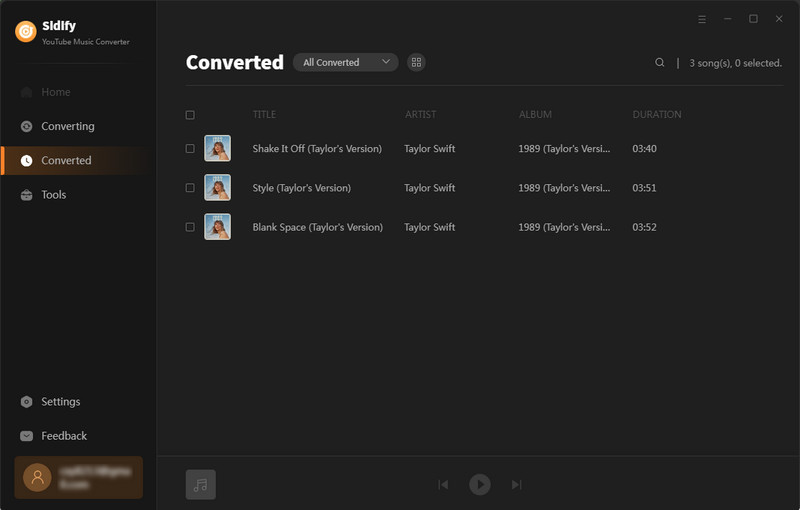
With the help of YouTube Music Converter, you can freely export YouTube Music playlists in batches to the computer for CD or DVD burning. Surely, you can put YouTube Music in some places which have not yet supported YouTube Music, like Virtual DJ software.
 700,000+ Downloads
 700,000+ Downloads
As long as you managed to download YouTube Music to the computer, you can now perform the task to burn YouTube Music to CDs. With Windows Media Player, you can burn YouTube Music to three kinds of discs: audio CDs, data CDs, and data DVDs, depending on your real need. You can make a CD that stores about 80 minutes of music and will play in almost any CD player. Or you can make a data CD or DVD that can hold several hours of music (or many photos or short video clips) and will play on PCs. A data CD will work in CD players that support the file types copied to the disc.
Make sure your Windows computer is well equipped with a CD or DVD recorder drive. And get you ready with a blank CD or DVD, there goes to burn an audio CD:
Step 1 Open Windows Media Player.
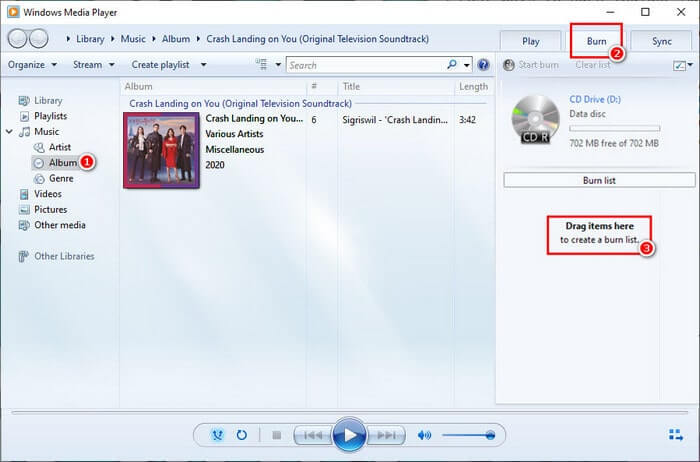
Step 2 In the Player Library, select the "Burn" tab, and then select "Audio CD or Data CD or DVD".
Step 3 Insert a blank disc into your CD or DVD burner. You then can directly drag the songs from the left to the right panel to complete the CD burning.
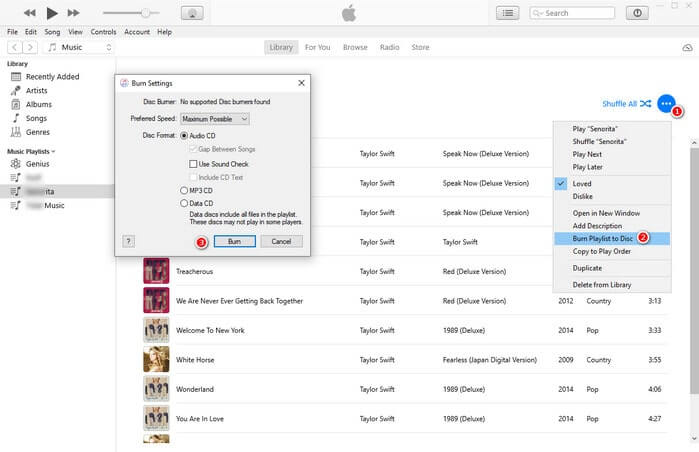
Another program you can use to burn YouTube Music to CD is iTunes, which is available on both Windows and Mac computers. It offers a music-to-CD burn feature, so you can import the already downloaded YouTube Music to an iTunes playlist and burn the YouTube Music to CD in this easy way.
Step 1 Respectively open the output folder with all downloaded YouTube Music and iTunes apps on your computer.
Step 2 Priorly create a new playlist on iTunes and add the YouTube Music from PC to iTunes by drag and drop gesture.
Step 3 Next, enter the "File" tab on iTunes and look for the "Burn Playlist to Disc" option.
Step 4 The "Burn Settings" window appears and you can customize your preferred parameters.
"Preferred Speed": Select a speed that is comfortable to you, but keep in mind that going slower should help your CD last longer.
"Disc Format": Select Audio CD to burn high-quality, uncompressed audio files, MP3 CD to burn compressed audio files that require less storage space, or Data CD to produce a disc with a variety of functions.
Step 6 When you're prepared, select "Burn" to complete copying YouTube Music audio on a CD.
If your computer is an Apple operating system, you can burn YouTube Music to CDs and DVDs more easily on Mac. The method we just described for using iTunes to burn music on CD may also be used with the Music app on a Mac.
Step 1 In the Music app on your Mac, choose "File > Add To Library or File > Import". And then locate the output folder (Refer to Part 1.) that includes all the download YouTube Music audio files and import the folder to the Music app by a new playlist.
Step 2 Insert a blank CD into your Mac.
Step 3 Open the YouTube Music playlist on the Music app, tap the 3 dots when you can find the option "Burn Playlist to Disc", and click on it. There will pop up a menu asking to default the inserted CD option, click "OK".
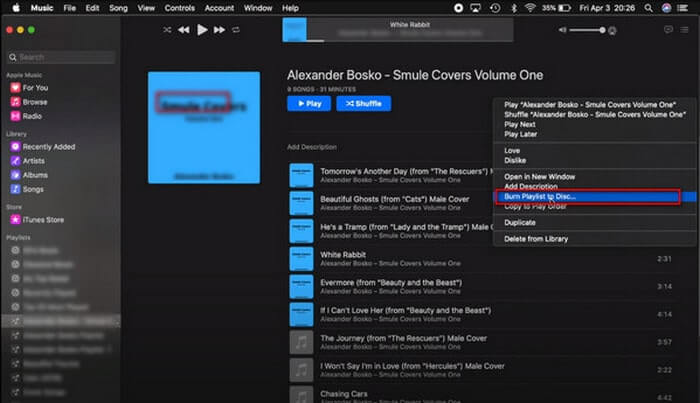
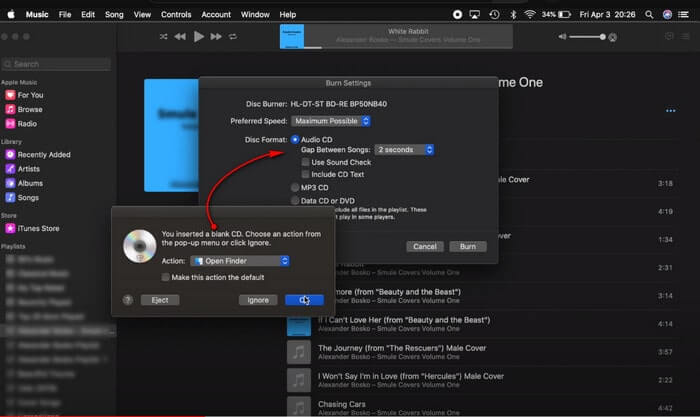
Step 4 Next comes the Burning Settings window where you can decide the Dics Format to "Audio CD" (to play these discs on any standard CD player) or "MP3 CD" (to play these discs on MP3-capable CD players or your computer.) Make sure you have previously converted YouTube Music to MP3 Format with YouTube Music Converter if you pick the "MP3 CD" option. When you set it all up, click the "Burn" feature to start burning the YouTube Music to CD.
Step 5 Wait until the CD is burnt, you can eject the CD from your Mac. And put the YouTube Music CD on your stereo for playing as you prefer.
There are still many software and programs supporting burning music to CDs, based on downloading YouTube Music as locally attainable files. Sidify YouTube Music Converter is a great deal easier to download YouTube Music songs than being a Premium user. It is now providing a limited-time free tier for all users, you can burn all your YouTube Music songs, playlists even podcasts to CD stepwise!
Note: Sidify works for both YouTube Music premium and free users. The trial version of Sidify YouTube Music Converter enables you to convert the first minute of each audio file for sample testing. You can purchase the full version to unlock the time limitation.
What You Will Need
Amazon Video Downloader
You May Be Interested In
Hot Tutorials
Topics
What We Guarantee

Money Back Guarantee
We offer money back guarantee on all products

Secure Shopping
Personal information protected by SSL Technology

100% Clean and Safe
100% clean programs - All softwares are virus & plugin free